
As of June 1st, 2025 – Advantage Computing has switched to NinjaOne for providing clients Remote Access to their systems. If you have not been setup already to access your computers, send us a ticket if you need assistance getting setup.
Table of Contents
How to Login to NinjaOne
Visit https://advcomp.rmmservice.com and enter your email/password (previously configured)

Provide your chosen 2FA (The most secure option is to use a Hardware-Based Security Key, we recommend integrating into your Bitwarden account or Password Manager of choice). You can also setup Time Based Authentication Codes (TOTP) with Bitwarden, JumpCloud Protect, Microsoft Authenticator, Google Authenticator or other app of your choice. You do have the option to get a code sent by SMS but we discourage use of this option as it is the least secure.

You will now see your computer(s) listed – You may have one or two options for connecting.

This is the NinjaOne Remote Icon and our Recommended way to access your system.

This is a Secure Remote Desktop Option – Please contact Advantage Computing at tickets@oraces.com if you want to setup a remote RDP link into your system. This is an alternative to the VPN and is more secure but requires configuration.

Click on the Ninja Remote Icon to launch the remote session. The first time you do this on any computer, you will need to install the NinjaOne Remote – most computer will select “Download for Windows 64)

The program will download (typically to your downloads folder). You will need to launch the application to install.


Read and approve the End User License Agreement, then click Install.


NOTE: After this completes, you may not automatically launch the Remote Session. In this case, close the popup you used to install and click the Icon again to launch. The first time you will need to approve the launching of the application.

This will then Launch Access to your remote computer.

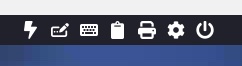
Hover over each of the Icons to see what they do.
From Left to Right:
- Sends “Control + ALT+Delete” for computers requiring this key combo to login
- Pastes the contents of your clipboard onto the other screen using keystrokes (this is more secure than passing your clip-board to the other device)
- This is a drop down of common command keys to send to the computer
- This allows you to send your clip-board contents or receive clip-board contents to or from the computer
- This enables Remote Printing
- This is the settings options for the remote session
- This icon provides options for powering or disconnecting the session
First Time Account Setup
You should have received and email from noreply@rmmservice.com in your email.


Click on Accept Invitation and setup your account:

Remember to use a complex password and store it in your Password Manager of Choice.

Drop the Menu down and select the 2FA you’d like to initially setup (we always recommend taking time to setup a secondary access in case you have issues with the first). In the following case, we have selected a Hardware-Based Security Key and will use Bitwarden so we type “Bitwarden” into the Security Key Name.

Assuming you have Bitwarden installed and added as an Extension, this should pop-up your account and allow you setup a new key.

You should now be logged into your account.
Additional 2FA Options
You can click Settings to add a second 2FA option.


Click on Authenticator App and “Configure”. You can scan the QR code here into your favorite Authenticator app or link it to your Bitwarden entry (as in the example below).
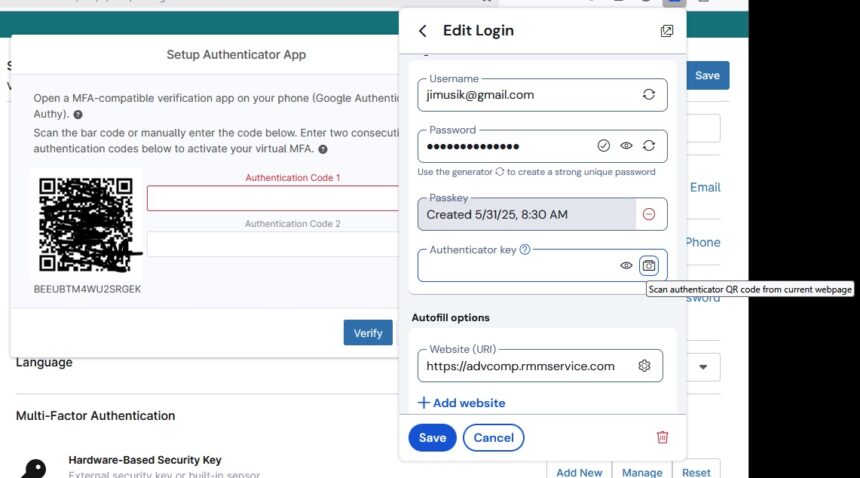
Please Note you must provide two DIFFERENT codes, i.e. waiting 30 seconds between them to confirm the 2FA.
Troubleshooting
Issues Logging In
If you are having trouble logging in or forgot you password, click on “Forgot your password?” on the login page. Enter your email and check your inbox for a reset option.

NOTE: If you had 2FA setup before, it will require you to complete it after you change the password. If you have forgotten or lost your 2FA access – you will need to generate a ticket to request that your 2FA be cleared so you can start the process again.
No Devices Listed
If you have no devices listed, it means you have not been assigned any computers. You will need to generate a ticket to request that we add you to a specific device. If you know the name of the computer you need to access, please include that in the ticket request.
Issues Launching the Remote Agent
- Confirm that you have downloaded and installed the Ninja Remote application. You can do this by clicking on the remote icon and choosing the download option on the pop-up.
- Make sure you allow the application to launch Ninja Remote (it may be being blocked in your browser)
- Make sure the computer you are trying to connect is turned on and set not to sleep
For other issues, send us a ticket and we’ll troubleshoot with you and update this page for other users to reference.